This Excel Gantt Chart template is designed for those who love to plan their work & life with no fuss. Visualizing your plan has never been this easy!
(ดูภาษาไทย ที่นี่)
With This Gantt Chart Template, You Have..
- Gantt charts visualization (Tasks timeline, milestones, and dependencies)
- Super easy to create task dependencies
- Tasks grouping
- Automatic highlighting for dependencies issue
- Ability to include or exclude Weekends
- Automatic net workdays calculation
- Actual vs Planned comparison
- Daily & weekly views
- Color customization
- Automatic highlighting for holiday
- Up to 1900 days of project timeline duration
What Our Customers Say About This Gantt Chart Template

Get This Gantt Chart Excel Template Now!
Download the trial version to test it out first. Then purchase the full version of this Gantt Chart template from Etsy with worry-free 7-day money back guarantee!

How to Use This Gantt Chart Template?
Prerequisites
- Microsoft Office 365/2013/2016/2019 for Windows, or Microsoft Office 365 for Mac
- Excel Macro: This workbook utilizes Excel macro – please refer to this link to see how to enable macro for Excel workbook. Also check the Unblock macro for file download from internet section below.
Project Setup
1. Click at the Configs button.
2. Select/enter the values for the following configurations
- Project Start : Start Date for your project
- Project Timeline Duration : Duration for project timeline (60 – 1900 days)
- Weekend Mode : Select the most appropriate option the reflect the weekend days of your project.
- Show Weekend : Choose whether to display weekend days in the project timeline area.
- Gantt Chart Labeling : Choose gantt chart labeling mode (None / Summary / Dates / Summary + Dates).
- Holidays (optional) : Enter the list of holidays for your project period. This information will be used for dates calculation as well as for the display in calendar area (i.e. holiday will be displayed in grey color).
3. Click Save Configs to apply the configurations and return to project view.
Adding/Editing a task

1. Double click at a cell below the Task column, an input form will appear on your screen.
2. Ensure that Task type is selected in the Type drop down, then type in the Summary.
3. Click at the Start Date button and use your mouse to select start date from project timeline. For your convenience, you can either the target date cell, or any cell under the same column – the corresponding date will be picked for you.
4. Either
(A) enter number for Net Workdays field, then the Finish Date will be automatically calculated; OR
(B) click the Finish Date button and select the finish date, then the Net Workdays will be automatically calculated
5. Optionally, you can choose to enter the % Complete now or come back to update it later. Chart color can also be customized from the color options buttons on the bottom left corner.
6. Click Save to finish.
7. To edit a task, simply double click at the cell below the Task column which corresponds to the task you wish to edit.
Creating Task Dependencies

1. Click at the gantt bar representing your predecessor in the Canvas area – the bar’s outline will become thicker.
2. Click at the gantt bar representing your dependent task – the Link Type form will appear.
3. Select the desired link type and click Save.
About Link Type:
FS (Finish-to-Start) - The dependent task cannot begin until its predecessor is completed.
SS (Start-to-Start) - The dependent task cannot begin until its predecessor begins.
FF (Finish-to-Finish) - The dependent task cannot be completed until its predecessor is completed.
SF (Start-to-Finish) - The dependent task cannot be completed until its predecessor begins.
4. To delete a dependency link, click at the dependency line twice and confirm the deletion.
5. If you mistakenly selected a gantt bar or a dependency line, and you want to deselect it, simply click at any cell.
Creating Project Milestones
1. Double click at a cell below the Task column, an input form will appear on your screen.
2. Select the Milestone in the Type drop down, then proceed to enter its Summary, Start Date, then click Save.
Creating Tasks Group
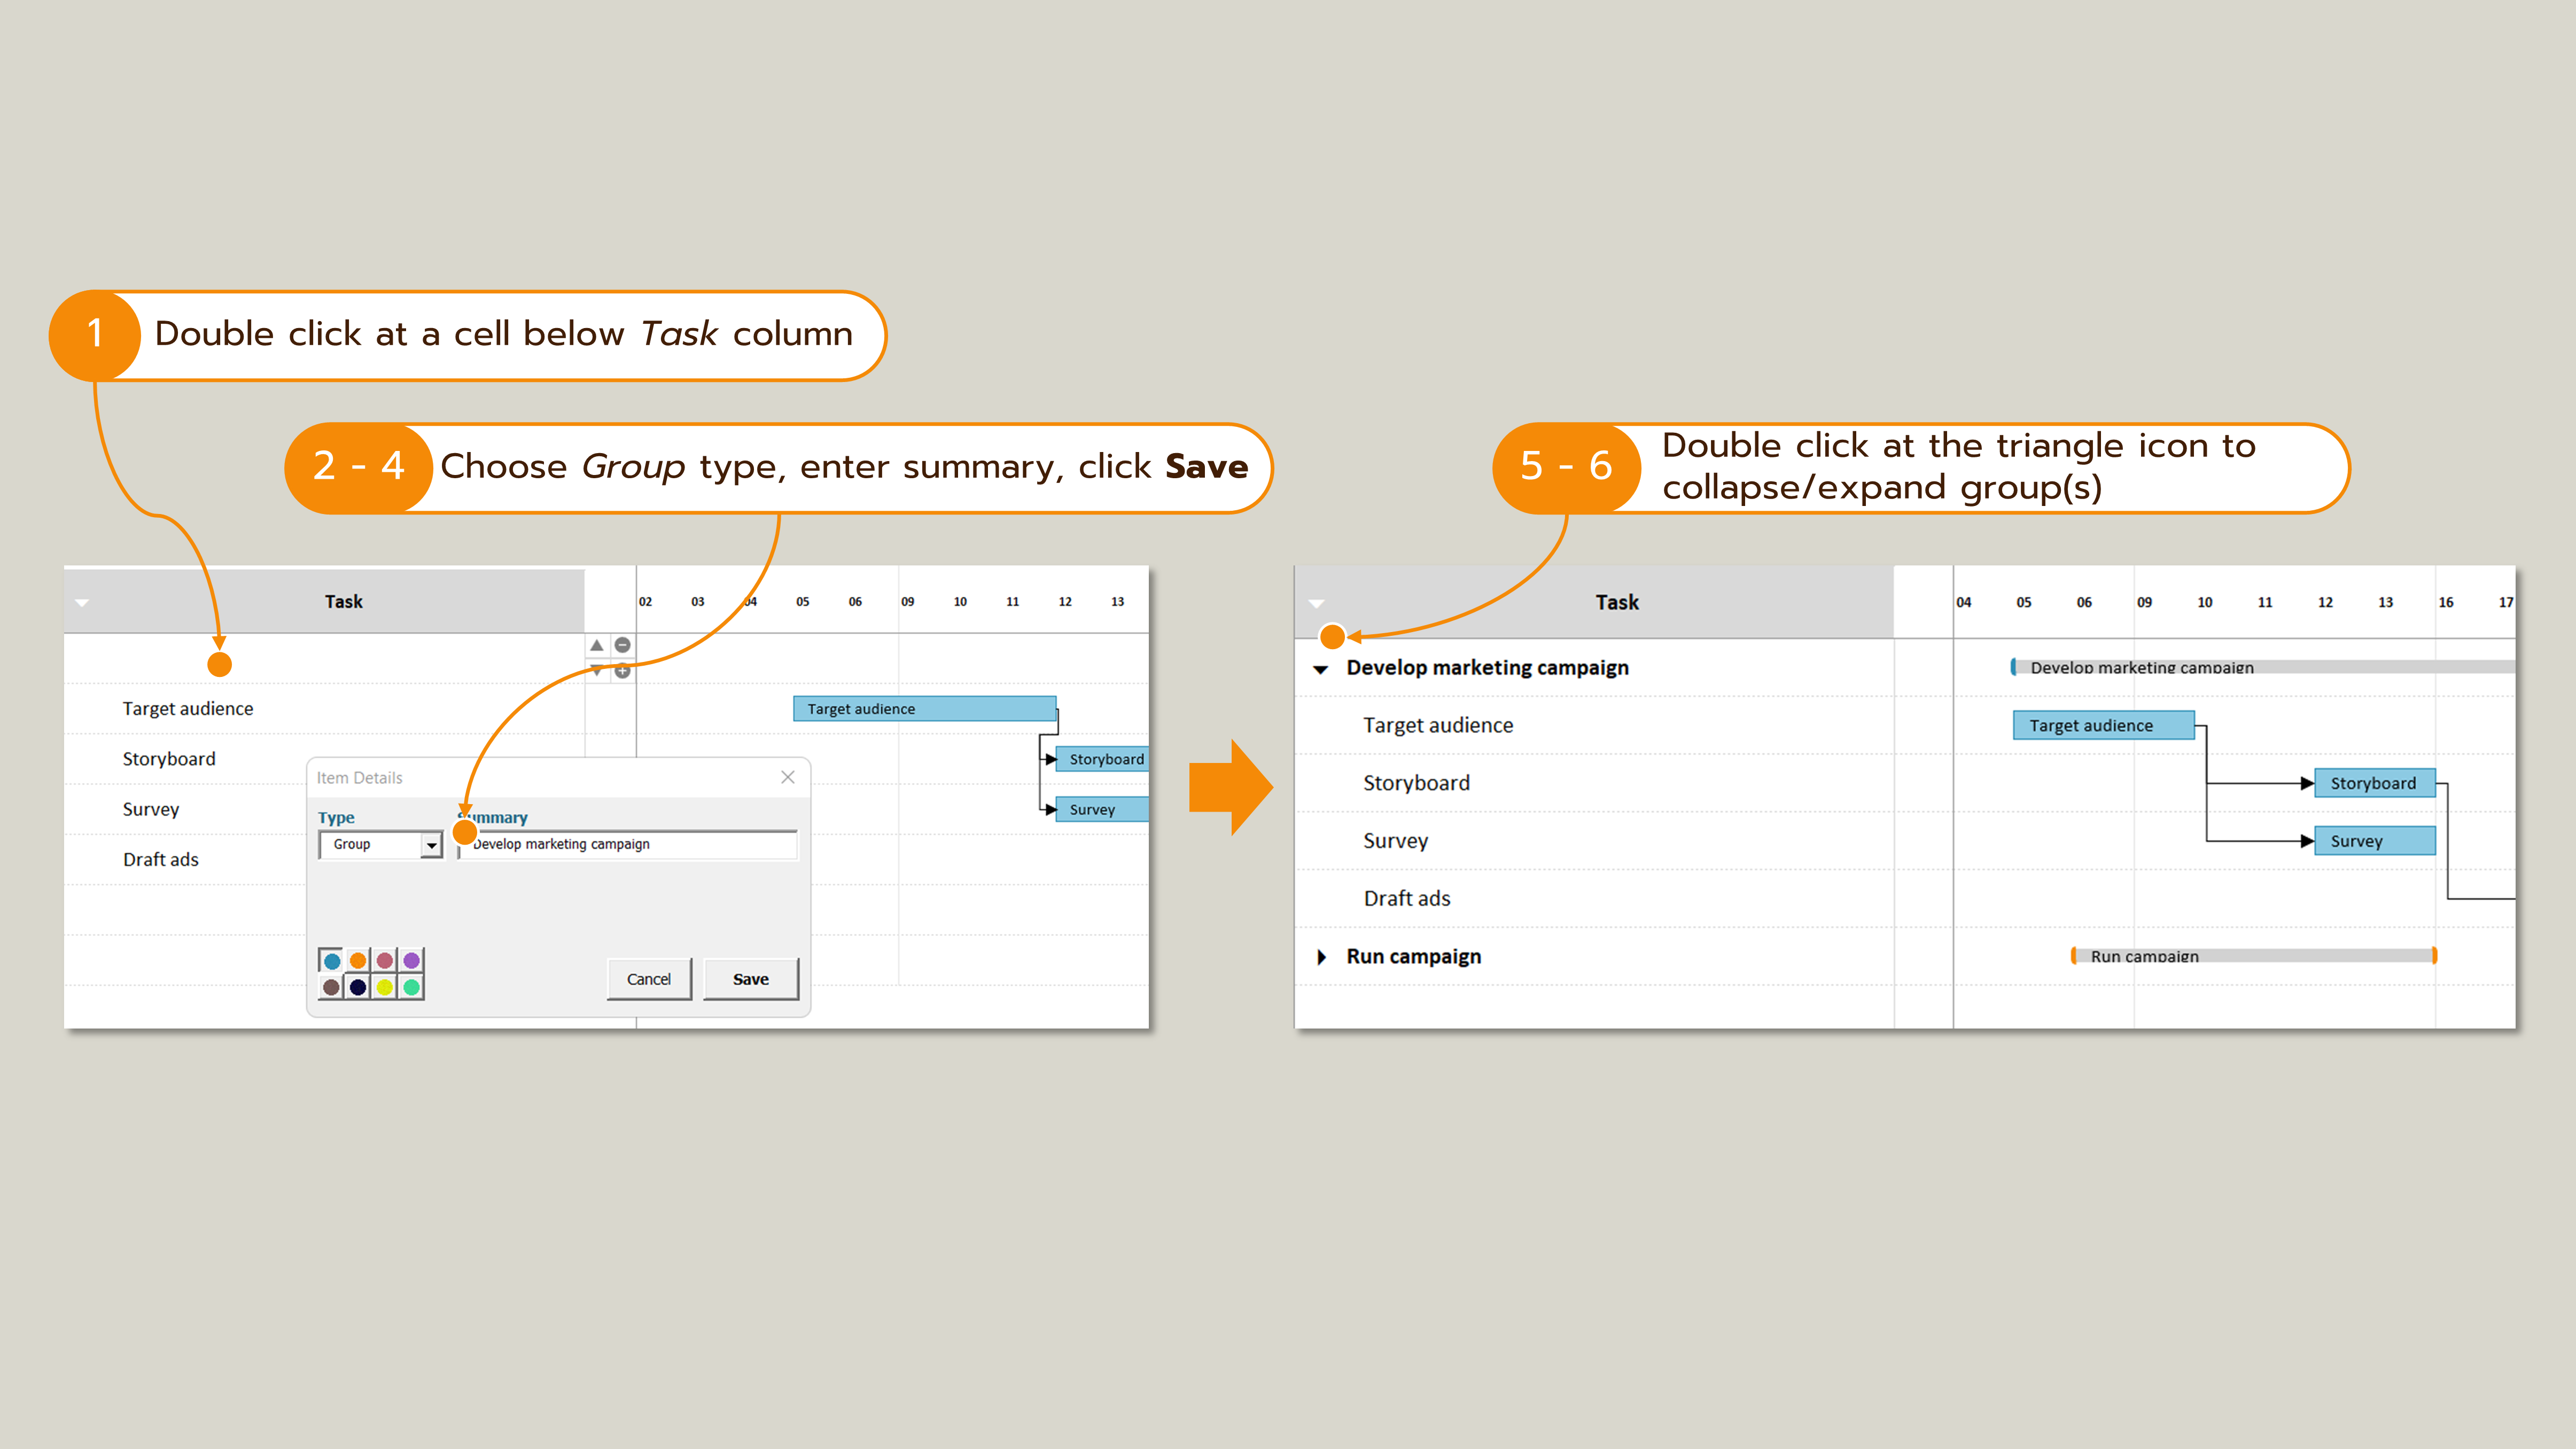
1. Double click at a cell below the Task column, an input form will appear on your screen.
2. Select Group from the Type drop down
3. Enter a group Summary
4. Click Save, then the tasks or milestones right under this Group item will be treated as group’s children.
5. To collapse or expand a group, double click at the corresponding triangle icon.
6. To collapse or expand all groups at once, double click at the white triangle icon at the top-left corner of the table.
Moving / Deleting / Inserting A Row

1. Click at an item cell under the Task column. You will see a set of action buttons shown on the right of the selected cell.
2. Click at the desired action i.e. Move up/down, Delete, Insert.
Note: If the selected item is a Group:
– Move action will move the whole group.
– Delete action : You will be asked whether to delete the group’s children or not
Known Issue : Sometimes the action buttons do not appear – When this happens, please try zooming in/out of Excel worksheet, and then the buttons should appear.
Comparing Actual vs Planned

You can set a project baseline as a snapshot of your original schedule before your project starts. Then as you adjust the plan during execution phase, you can see how the project is doing compared to the original plan.
1. Once you have finalized your original plan, click at the Baseline Tools button. The Baseline Tools form will appear on your screen.
2. On the left half of the UI with the title Baseline, activate the Show option.
3. Under the section Set Baseline for, click at the All button, then click Yes to confirm the operation.
4. The baseline bar in light gray color will appear beneath each of the gantt chart bar. From this point, when you update your actual plan, you can easily compare it to the original plan.
5. To hide the baseline bars, open the Baseline Tools form and uncheck the Show option.
6. To delete the baseline, open the Baseline Tools form and under the section Clear Baseline for click at the All button.
7. If you need to set or update a baseline for specific items, first make sure to highlight the targeted items below the Task column, open the Baseline Tools form, and under the section Set Baseline for click at the Selected Items button. Note that this will really update the baseline for selected items only, and not their respective parents (i.e. Groups) or child items.
8. To provide further flexibility, Baseline2 is also available on the right half of the Baseline Tools form. For example, in some occasions, you may want to take snapshots for both your original plan, and the ‘updated’ plan. Baseline2 is depicted with the bar in dark gray color.
Rescheduling Multiple Tasks
- To shift dates of multiple tasks, select the cells of desired tasks then click at the Rescheduler button. You will then be prompted to enter number of days, for example, when we enter 2, dates of selected tasks will shift to the right for 2 days. Note that this feature will respect ‘Number of workdays’ whereby if the new dates overlap with non-working day, finish date will be recalculated automatically based on Start Date + Number of workdays. We can also shift dates to the left by entering negative number.
Switching Views
- To switch between Daily, Weekly, Quarterly views, click at the Day/Wk/Qr button.
- To show or hide item details, click at the Toggle Details button.
Other Actions of This Gantt Chart Template
- Click at the Select Today button to select the current date column in the project timeline
- Click at the Tools & Help > Export, select the destination folder, give the name to the new workbook and click Save. This will export the project sheet to a plain Excel book with no buttons/controls/macro. Best for sharing the plan to others.
- Click at the Tools & Help > Help button to access this help page
- To Reset the project sheet, click at Configs button and click at Reset Project. This will delete all the tasks/milestones/groups from the project sheet.
Unblock Macro for file downloaded from internet
For an individual file, such as a file downloaded from an internet location or an email attachment the user has saved to their local device, the simplest way to unblock macros is to remove Mark of the Web. To remove, right-click on the file, choose Properties, and then select the Unblock checkbox on the General tab.

REF: https://learn.microsoft.com/en-us/deployoffice/security/internet-macros-blocked
